 Many people who hike the Continental Divide Trail use a GPS. It is possible to hike the trail without one, but I am not one of those people who relies solely on map & compass. Basically, the CDT is less defined and more remote, so a GPS is helpful. I want to focus this post on assisting others going through the same torment as me of getting their first GPS and how to load it with the proper information needed for the CDT. I want to point out that the process I describe is not the only way to go about doing this. This is just what I did and what worked for me. I am a complete novice with everything concerning a GPS, so I thought I’d help others going through the same process by putting it in the basic steps that I understood. For the rest of you, I thought it would give you appreciation for the prep that takes place before a big hike like this.
I chose to go with the Garmin eTrex20. It seems to be the popular choice among hikers this year for a few reasons. It think it gives me the most bang for your buck. At $180, it is the most affordable option I found. It is also one of the lightest options at 5 ounces. I know Garmin is not the only GPS producer on the market, but this post is focused on how I loaded a Garmin, so I’m not sure it will be as helpful to those using a GPS from another company.
Before I start with the step by step instructions, I have to give a HUGE shout out and THANK YOU to Coach K and Halfmile. I met Coach K when he was helping trail angel at the Red Moose on the PCT. Coach K did the CDT this past year and completed his triple crown. Yay! He has been incredibly patient and gracious with his time as he has spent hours on the phone walking me through these steps. THANK YOU Coach K!!! Halfmile is the king and most trusted of the map producers for the PCT. He is also creator of PCTNews.com. His enthusiasm and knowledge of mapping and GPS usage is amazing! We recently had a 1hr 40min phone conversation in which most of it was him walking me through the nuances of the GPS…just for fun! I’ve heard countless stories of how he’s helped others in the same way, so THANK YOU Halfmile!!!
Loading Free 24K Maps Onto a Garmin
Please read over this whole section completely before attempting to load anything. Most GPS units come with 100K maps. Those are not detailed enough to
be useful for hikers. What you need are 24K maps, but they will cost you
hundreds to buy from Garmin’s website. Another alternative (that is
free, but more labor intensive) is to use http://www.gpsfiledepot.com/

This website is great! It has a donate button on the page, so be sure to DONATE since you would have paid hundreds to buy these maps through Garmin. It will walk you through all the steps I’m telling you, so feel free to use their tutorials if you like them. I first found the site to be overwhelming, but if you take it step by step, you’ll understand it. You can download maps from all over the world by using the drop down menus in the upper left hand side. The maps can change year to year, but here are the links to the ones I downloaded for the CDT this year. New Mexico, Colorado, Wyoming, Idaho and Montana.
****WARNING*****READ THIS BEFORE DOWNLOADING MAPS****
When you scroll down to download, there may be a notation in red. It will look like this….

BEFORE you download onto a PC you need to download the “My trails…” link they have provided. The maps won’t download correctly without this and you only need to download this ONCE and it will be installed for all future maps.
**Don’t forget that once you’ve downloaded each of these things, you need to click on them in your downloads to open a wizard that will INSTALL them.
Right now, I recommend that you start by downloading just COLORADO and then follow the next step to make sure you can view it on your computer.
You will NOT be able to see the maps on your computer until you follow the steps below….
Viewing Downloaded Maps On Your Computer
I am one of those types who tries to do things without reading the instructions. This was a huge disadvantage for me here, so TAKE YOUR TIME! I wasted a lot of time doing it wrong when it is simple to do it right if you pay attention. First, download Garmin BaseCamp. This is the new map viewer that seems to be replacing MapSource. You will see the term MapSource used on gpsfiledepot and other sites…but it is no longer being updated. It is recommended by gpsfiledepot that you use Garmin BaseCamp. They both serve the same function for our purposes. Again, one you download BaseCamp, make sure you click on it to fully install it. Mine was saved off the desktop when it installed and I had to do a search on my computer and then pull it onto the desktop for easy access. Once you have downloaded it, open BaseCamp and it will look like this.
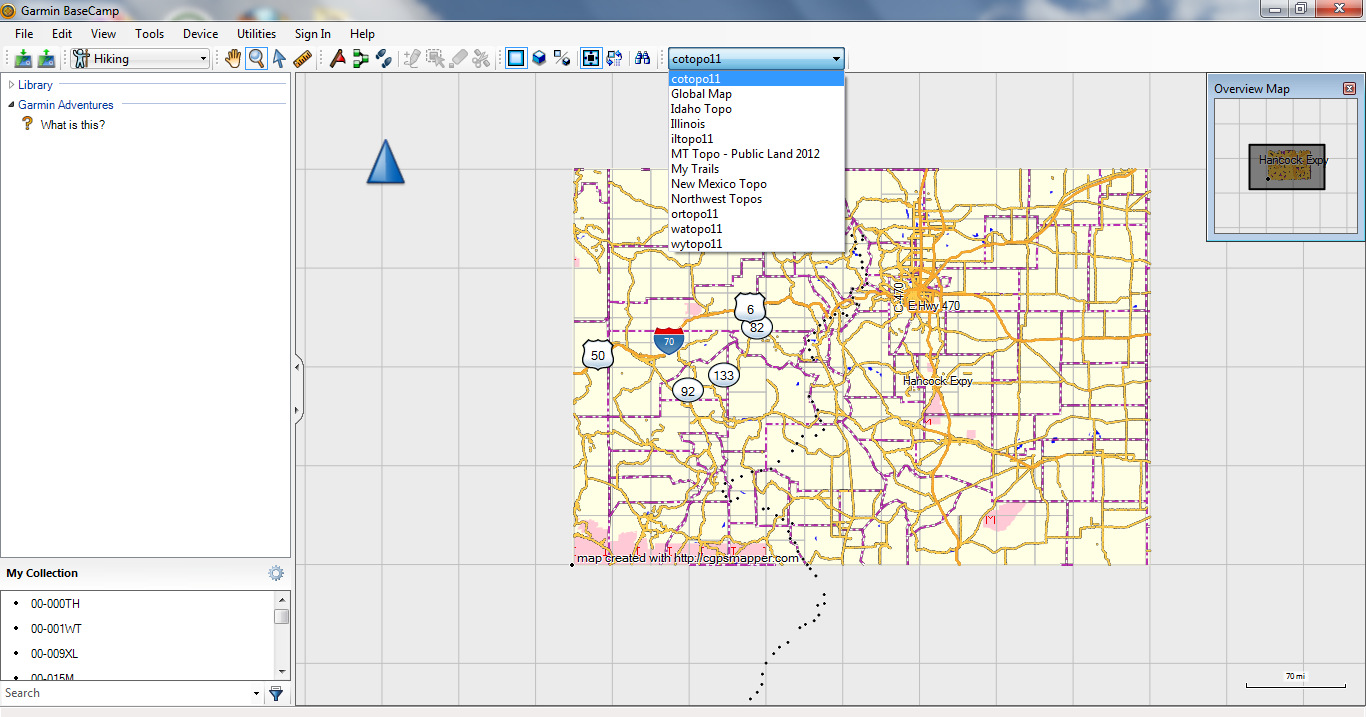
Notice a couple of things…there is a drop down menu on the left that should say “hiking” and the drop down in the center contains any maps you have downloaded so far you should have “My Trails” and “cotop11”. Choose “cotopo11.” You can only view one state at a time. If you see the Colorado map, then you did it right! If you zoom in you’ll notice it looking more like the topo maps you are used to seeing on trail maps. Notice the little black dots on mine…those are waypoints for the CDT! That lesson is still to come….
Loading Maps Onto Your Garmin GPS
Now for the final step to see these maps on your GPS. You need to download Garmin MapInstall to your computer. Again, don’t forget to fully install it and pull it onto your desktop for easy access if it gets saved deep into your computer files. I made a folder titled “GPS” that has all the programs because more are coming for the waypoints and tracks!
-Connect your gps to your computer (with an sd card in it!)and then open MapInstall…it should look something like this…
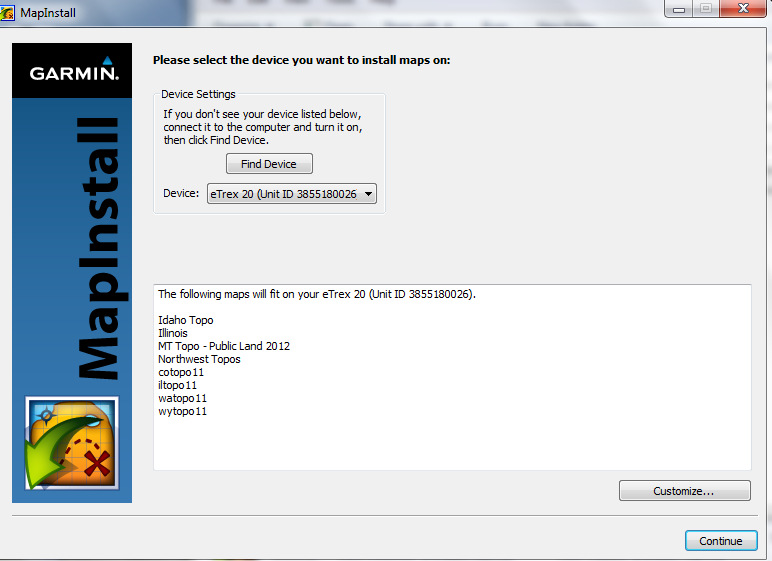
Now, BE CAREFUL HERE! If you select “continue” it will load all the maps and all sections onto your GPS and that will be too much. A GPS does not hold an infinite number of maps and will take longer to load when you turn it on if you have a lot of maps loaded. You want to choose “Customize.” The screen will then look like this….
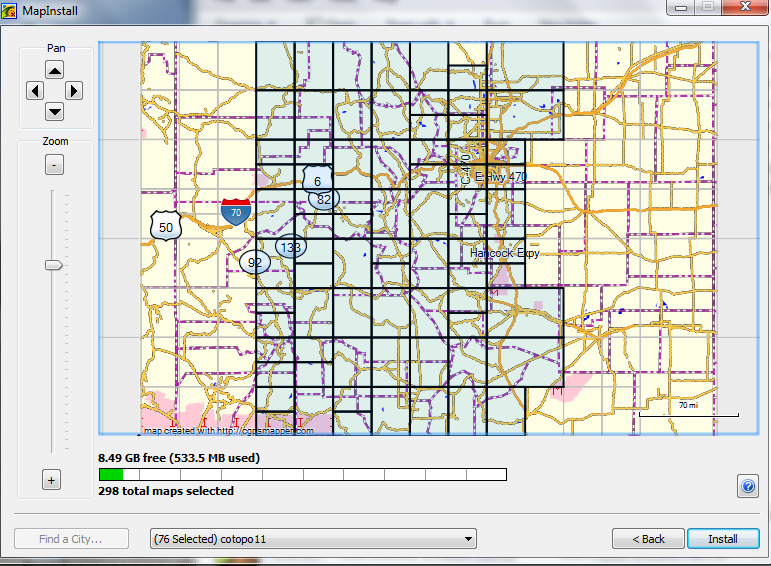 |
| Careful…RIGHT click to deselect areas. BLUE sections will load on the GPS. |
 |
||
| Be sure to select “Advanced/Partial” Install… |
Be sure to carefully select the sections you want to load. Above, I have selected the central part of Colorado. After it installs, disconnect your GPS and see if the map is there. *NOTE: Whenever you load maps on MapInstall, it will automatically reinstall previous maps. If you deselect those maps before it installs, it will only load the new maps you’ve selected and uninstall the previous ones from the GPS. Just be aware of that when using MapInstall.
Congratulations! Step one is done! Now the next tutorial is getting those waypoints and tracks on there….


Thanks a lot for this guide, I will definitely try it again sometime soon.
Looking forward to read about your CDT hike.
cheers Sarah
You are welcome Sarah. Hope to pay it forward for those who will hike the trail in years to come!
Life saver , thanks !
I was able to transfer the Colorado map you recommended (cotopo11) to my Garmin eTrex 30x, but when I enable it on the Garmin, it does not show. Any suggestions?
Did you also add the My Trails file I also mention? No map will show without that one also loaded for some reason.
That did it! Thanks so much for your help. I should mention, however, that I didn’t previously load My Trails because of the following line in the tutorial: “BEFORE you download onto a PC you need to download the ‘My trails…’ link they have provided.” I interpreted “PC” to mean IBM PC, and I have a Mac.
Ah! Good to know. I will need to change that verbage.
Going to be hiking the CDT nobo in just 43 days!! Your information has been invaluable!
Thank you so much! So clear and concise too!
Many thanks
Joe