Aaaaahhhh! It’s that time of year again! The newest season of Walking With Wired will be the grandest yet, and will begin on April 4th when I arrive in Kathmandu, Nepal. Over 3 months and ~900mi, I will be thru-hiking the length of Nepal with Buck-30 and Griggs along the Great Himalaya Trail. More details to come on a future post that will describe the route itself. I gave a brief introduction in my “On the Horizon for 2018″ post. Right now, it’s time to focus on GEAR! The climate and conditions of Nepal will require a bit of a different kit than I usually carry. It’s become the impetus for me to make the leap to some even more quality gear; some of which will remain as my core gear kit for future seasons.

I do want to be transparent in saying that I am an ambassador for many of the gear companies I use. I think you all know me well enough to know that I do not use gear just because it is free. I am not a walking commercial constantly throwing out gear references at every opportune moment, and I do not get any kind of commission from the companies that sponsor me. The gear I select is chosen because it is quality lightweight gear that I can rely on!
I have been very fortunate to have added ZPacks, Montbell, and Katabatic Gear to my list of sponsors during this off season. It’s been very surreal the way everything has progressed and evolved over the last 7yrs, but it also feels very natural and in cadence with what I’m innately doing. These companies are among the best of the best in outdoor lightweight gear, and I hope to make them proud to have me as an ambassador. Some of my sponsors even provide items for raffles at my presentations. I don’t list them outright very often on the blog, but I do want to thank them personally here. THANK YOU to Gossamer Gear, Sawyer Products, StickPic, Dirty Girl Gaiters, Zpacks, Montbell, Katabatic Gear, and Trail Designs.

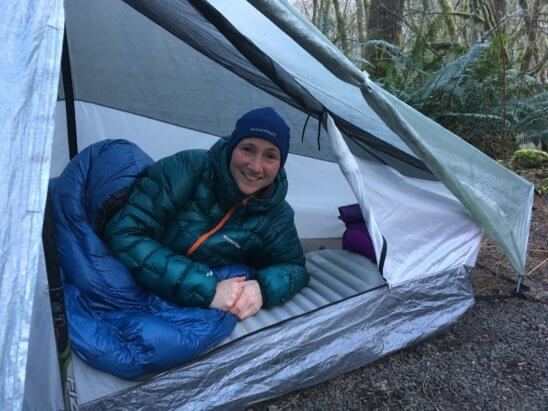
A recent photo taken after a raffle at a recent presentation.
After a thorough audit of my gear list by professional accountant Buck-30, it was concluded that my routine base pack weight (BPW) is 13lbs 10oz. By no means is that ultralight, but it is lightweight, and it is honest (even to include the weight of credit cards and cash). For Nepal, I will be carrying heavier gear that is detailed below and has a BPW of 16lbs 7.1oz. For half of Nepal, I’ll be carrying an ice axe and crampons, which will bring my BPW up to 17lbs 14oz. So, without further ado, let’s unveil the gear for Nepal! I’ll note which items are Nepal specific, and which ones I plan to keep as my core gear kit. The complete Nepal gear spreadsheet is embedded at the end of this post, and will be linked in my Gear Tab with other gear lists/reviews for future reference.
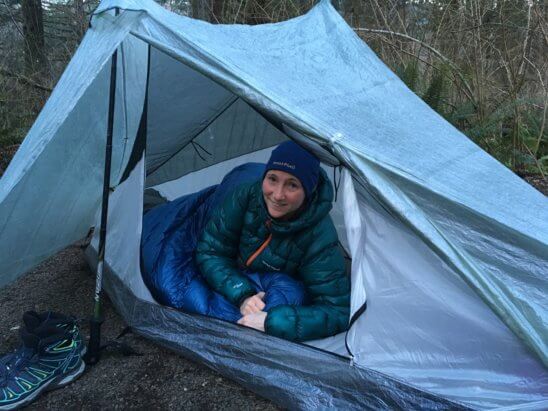
Katabatic Sawatch 15F Quilt (1lb 6.6oz) & NeoAir XTherm (1lb 3oz)

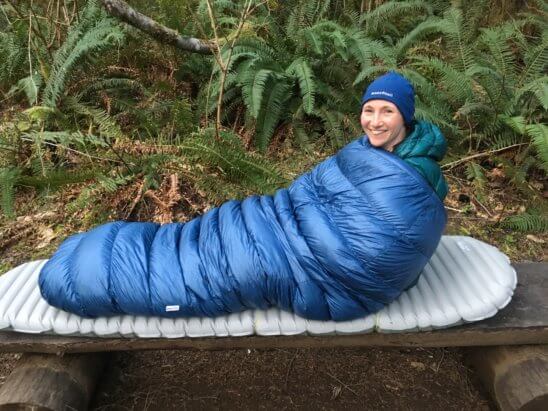
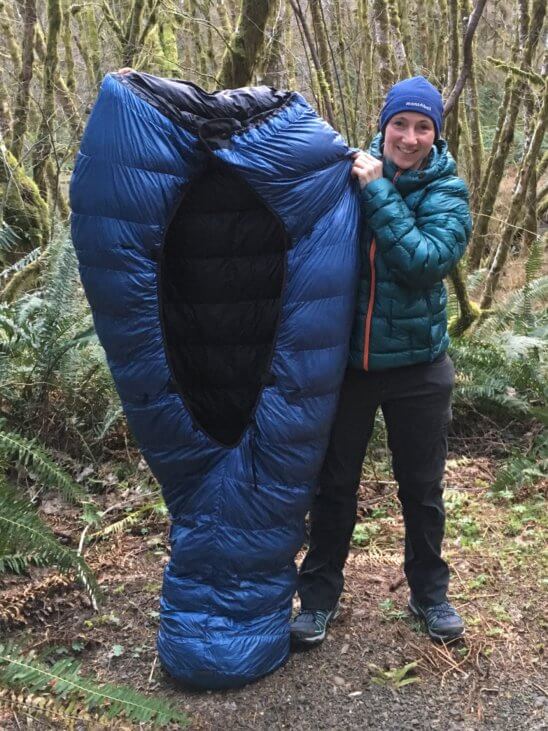
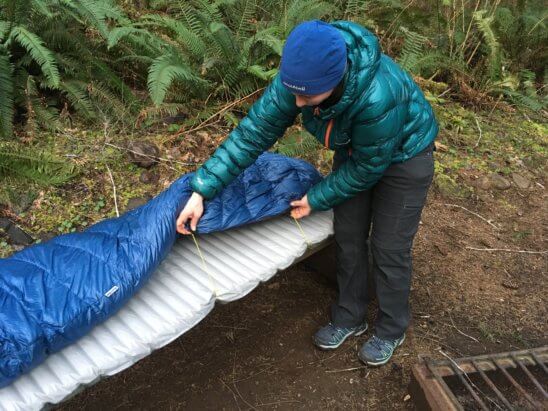
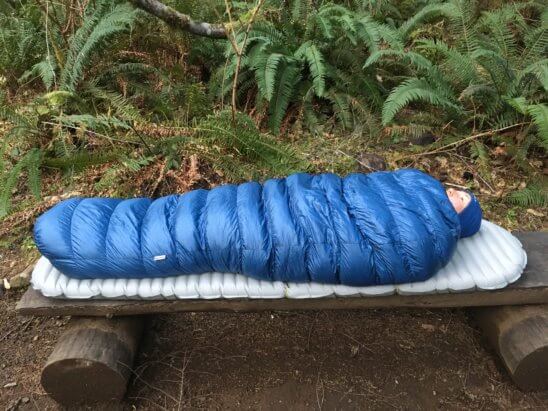
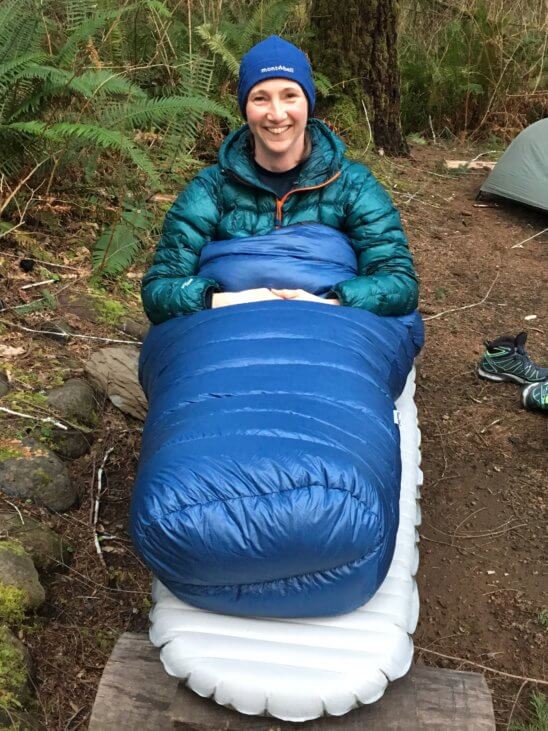
Probably the most motivating factor in my gear updates is that it will be COLD in Nepal, particularly overnight at camp or in tea houses. I get cold easily, so I want a sleep system that will keep me warm. A major change is that I’ve upgraded to a Katabatic Gear sleeping quilt, the Sawach 15F. I’ve used Zpacks sleeping bags for years, and they have served me well. However, now I need more. Katabatic Gear’s sleeping bags and quilts have the reputation of being the highest quality bags with most accurate temperature ratings. Griggs will also be using a Katabatic bag for Nepal.
Notice that I will be using a quilt for the first time. There is no zipper to fully seal the bag. The concept behind a quilt is that weight is saved by not having down where your body would be compressing it and rendering it useless anyway. That allows for more loft above the body and at the foot box where it counts. Most nights, I tend to sleep with my bag unzipped anyway, but if temps really drop, Katabatic has a cord clip attachment system (pictures above) that keep the quilt in place and prevent drafts from getting in. There are instructional videos on the Katabatic Gear site to understand more. Other features I really enjoy are the overstuffed neck collar that seals in warmth and the overstuffed trapezoidal foot box that is super roomy and warm. I know many are apprehensive to get a bag that doesn’t have a hood or zip completely, but those features really are extraneous and add weight. I’ve been hesitant to make the leap to a quilt as well, but I think it will work out great, and I have made this a permanent switch that will be part of my routine gear list from now on as well.
I’ve also upgraded my sleeping pad (just for Nepal) to the NeoAir XTherm. The XTherm has a 5.7 R-value vs the Women’s XLite’s 3.2 R-value. It will be 4oz heavier than the XLite, but it will be worth it for the additional sleeping warmth in Nepal.
Tarptent Notch Li w/partial wall (1lb 4.9oz)
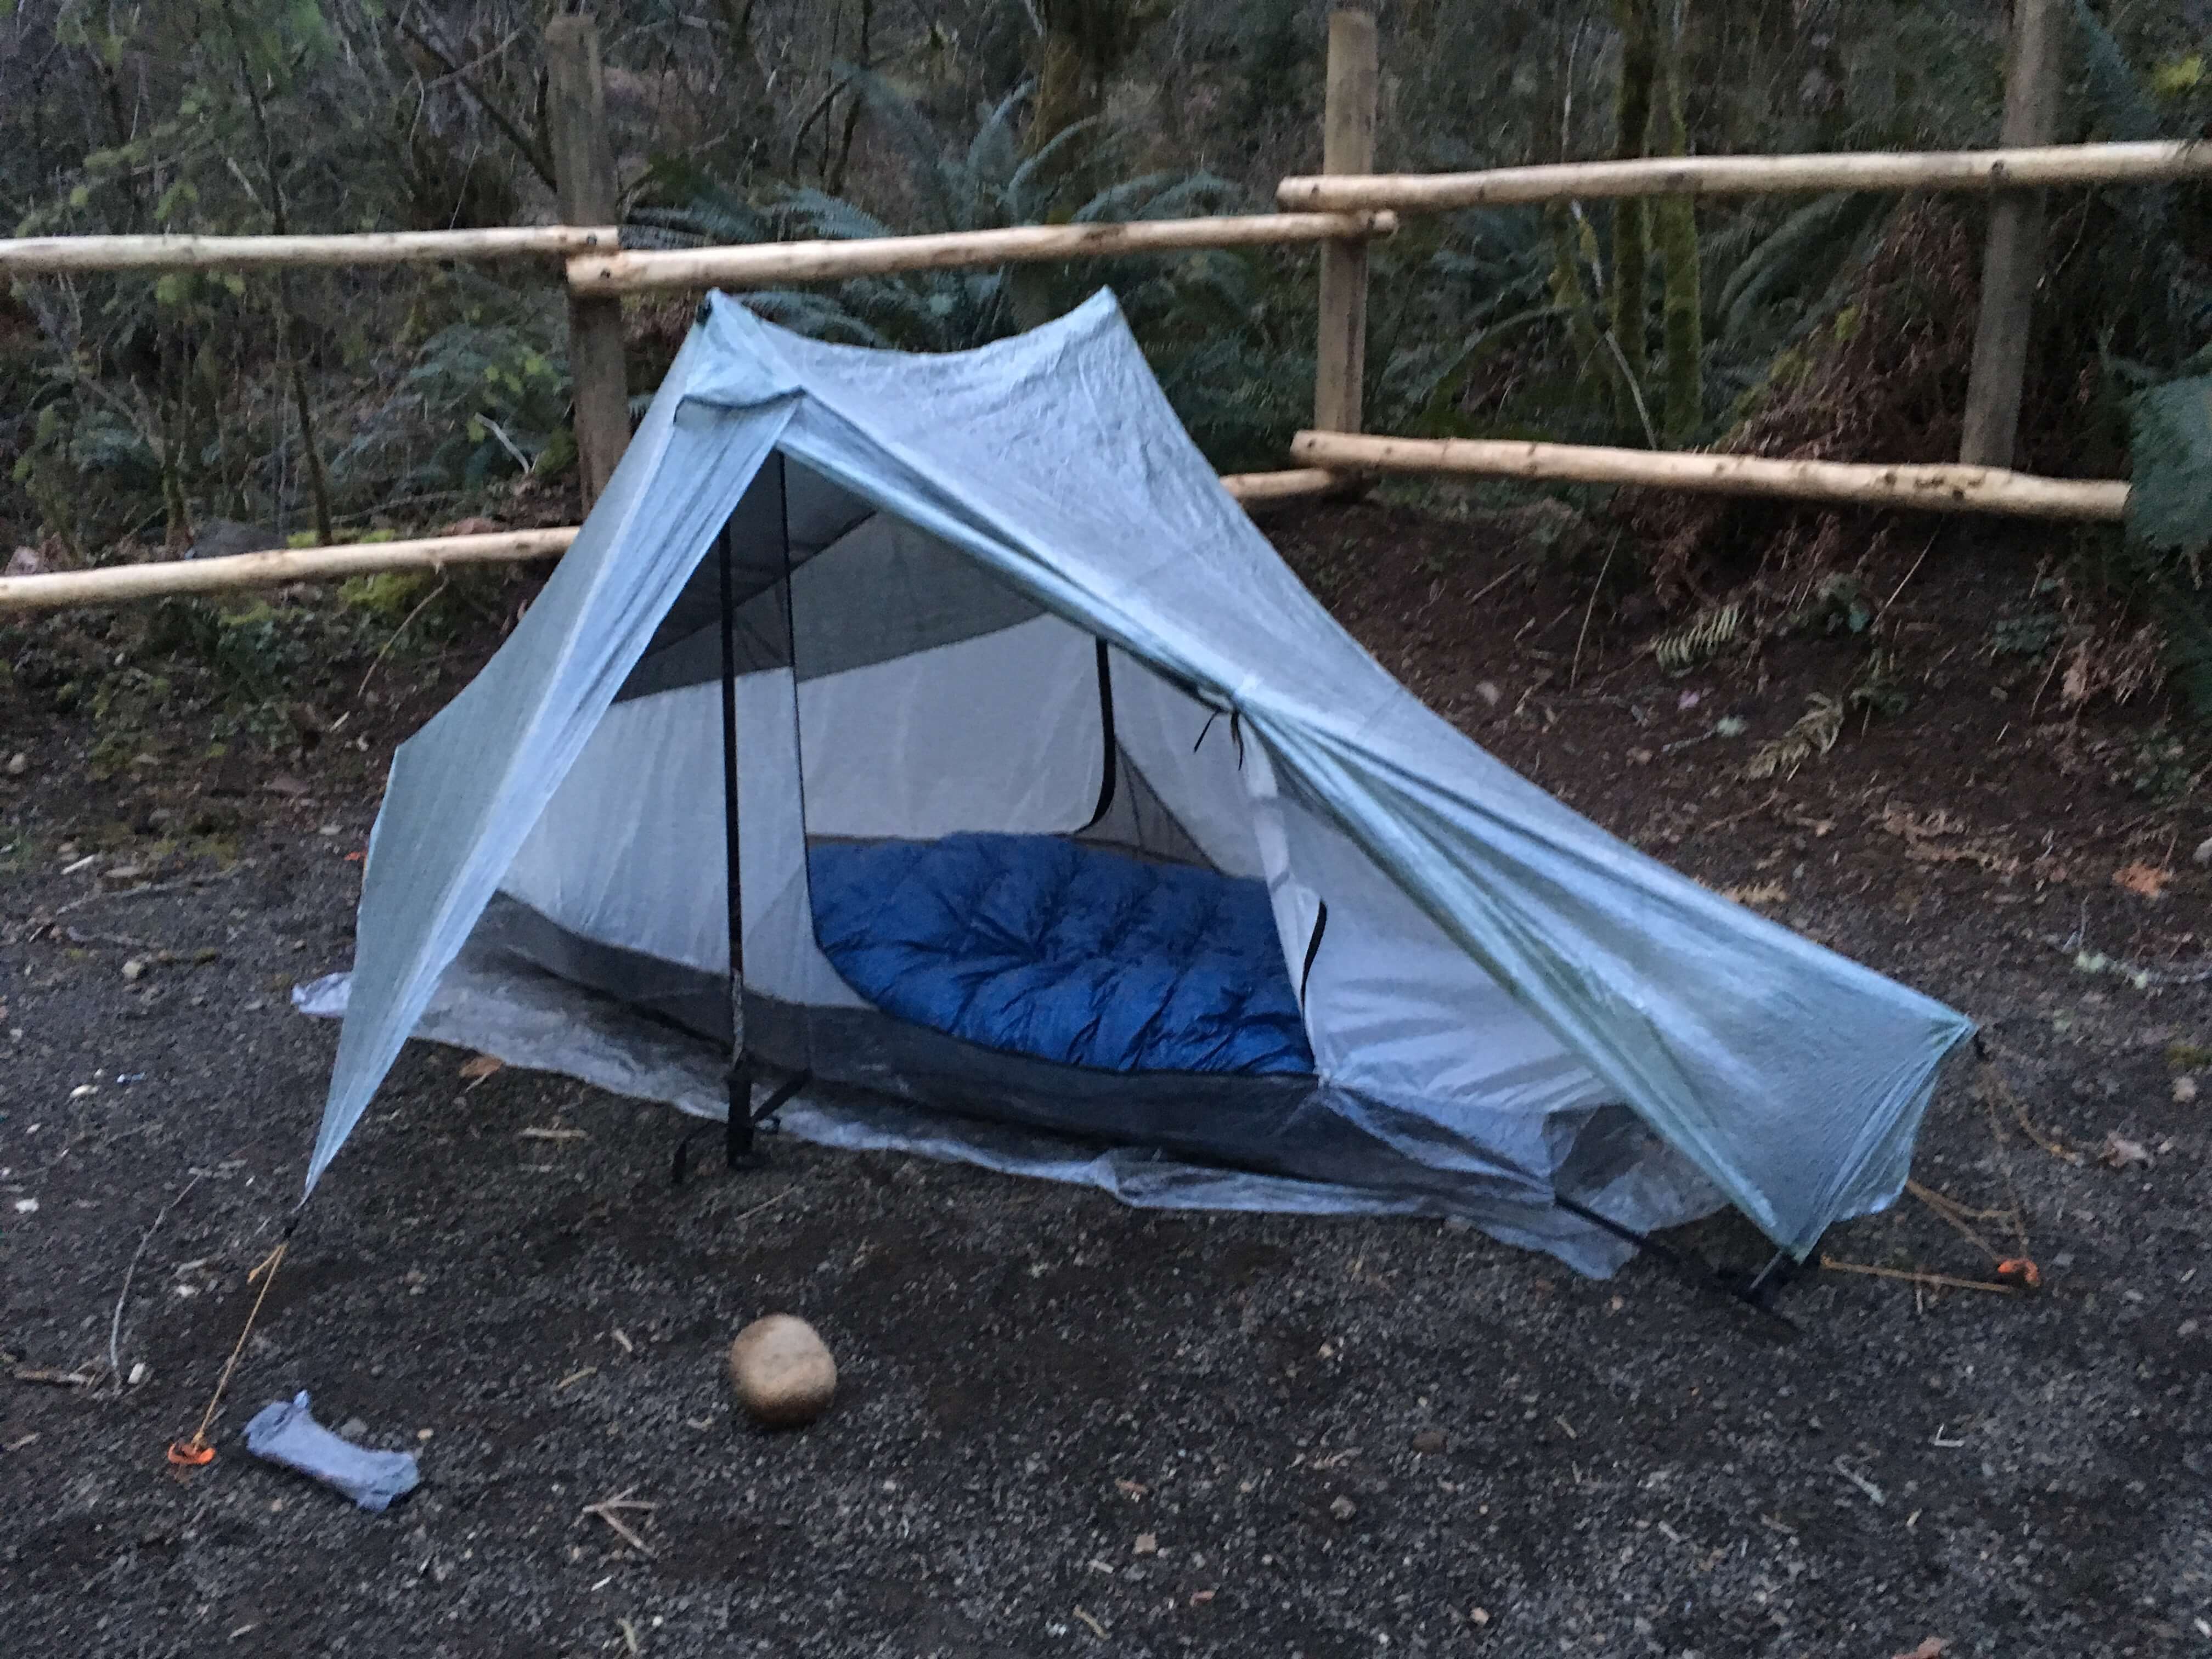
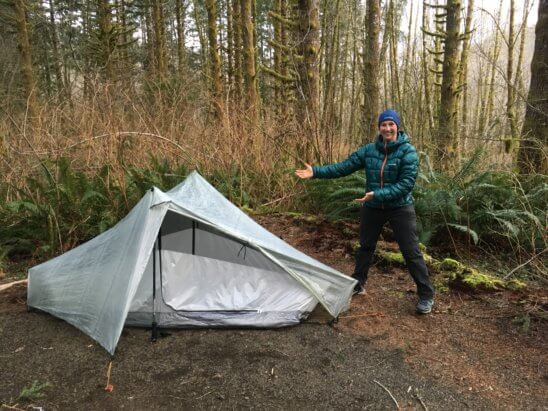
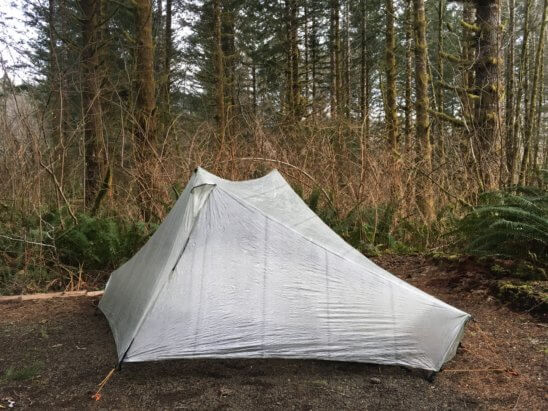
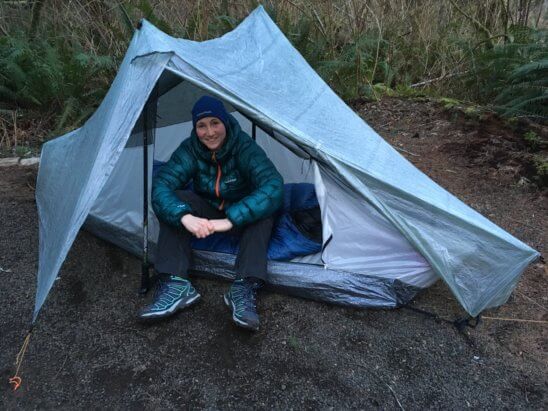
By now, we all know my true home away from home is the Zpacks Solplex. However, for Nepal, I know I want something more insulated for warmth and more protected from harsh weather. It gets quite cold at night in Nepal and it seems that it can snow or torrentially downpour at any given moment. The goal was to find something that fit these requirements without increasing my pack weight too much. I was eyeing the Tarptent Notch as a solid contender. As I inquired more about the Notch, I found out that Tarptent would be offering the Notch in Dyneema (aka Cuben Fiber)! After 19yrs of making quality silnylon tents, the Notch Li is Tarptent’s first tent to also be offered in Dyneema, the exceptionally lightweight yet pricey material. That cut 8oz off the weight of the Notch, making the setup (with only 4 stakes needed) just 4.7oz more than my Solplex. The Notch Li is an awesome double walled tent that’s just 1lb 4.9oz. I’m seriously giddy just thinking about it! Buck-30 will also be bringing the Notch Li to Nepal.
While I am very excited to use the Notch Li on the Great Himalaya Trail, my personal preference will still lie with the Zpacks Solplex for my general backpacking and thru-hiking. I love the space of the Solplex and the option to have both storm doors open at night to see all around me and be that much closer to the outdoors. The Notch Li with the additional partial wall certainly feels more like closed off room, which is my intention for Nepal. I’m sure the regular Notch/Notch Li without the partial wall feels much more connected to the surroundings. It’s a snug fit in there, but due to the double wall and interior mesh, I don’t have to worry about condensation when I touch the walls. The foot of my sleeping bag is a bit damp in the morning, but that’s not uncommon if I have it all sealed up. That warmth and moisture has to go somewhere.
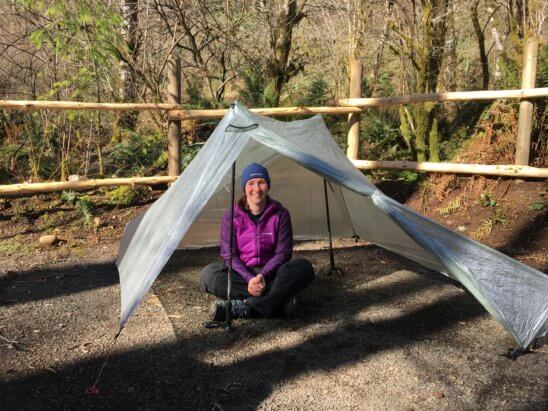
A cool option with the Notch is that it can also be setup with just the interior mesh (with more stakes and line) or just with the outer wall. Separating the outer wall is a great option to have if you know you’re in for a full day of rain and want to keep the mesh away from the wet wall. Also, it provides somewhere dry to have lunch. Note, it does take a bit of time to reconnect the two parts.
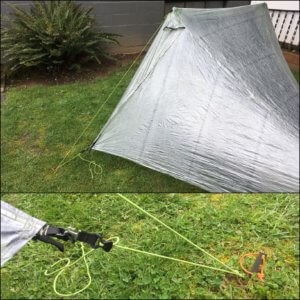
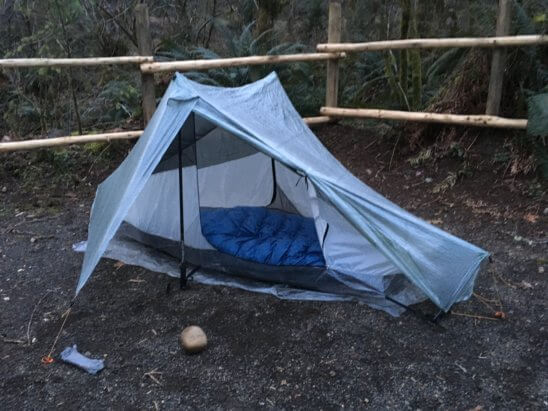
Using the Zpacks strategy to use one stake to make the ridge line taut and stake out the doors.
The one improvement I’m making is that I am going to use Tarptent’s option of pitching the tent using the guyline from the apex of the tent rather than just the door.With the tent only staked out via the door guy line, the ridge line can sag a bit (see photos above). I imagine in high winds and snow, the tent would not be ideally taut. That makes that top ridge line taut (as shown in the photo). The Notch Li DOES NOT come with extra line to do this, so beware to order that if you want to be able to pitch the tent more taut. The regular Notch does send with that line included. Since each line does adjust independently, both the apex guyline and door guyline can be held by the same stake and doesn’t require an increase in stakes carried. To avoid needing to put the stake through two different loops, I realized that I could use the Zpacks Solplex door hook that allows the same guyline to attach to both the apex of the tent and the bottom of the storm doors. I ordered Zpacks cord and Tent Door Hooks. I’m still waiting on that order to complete the update, but I’m excited that it works and I’ll post more about it later. The added door hook from Zpacks is just a personal preference and not a must have to stake out the ridge line. Hope all that makes sense. In theory, pitching from the apex would also allow for both sides of the door to roll back for those that like to have views and more air on nice nights. You just may need to do some tailoring to add your own door tie since just one side has the tie to hold the door back.
Montbell Storm Cruiser, UL Thermawrap Parka, and Plasma 1000 Alpine Down Parka
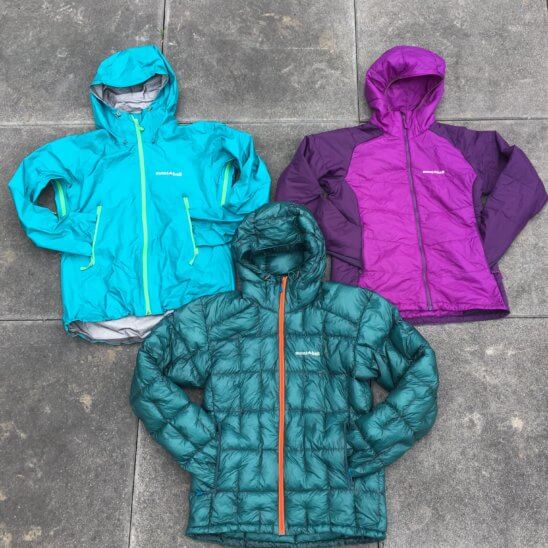
When I knew I was headed on the Great Himalaya Trail, I knew a major change would be my jacket strategy. On milder climate trails, the lightweight jackets are fine to get by, but there’s no messing around in the high altitude mountains of Nepal. The last few summers, I’ve been on trails that have more cold rain than most long trails in the US tend to have. I fell in love with my Montbell Torrent Flier rain jacket. It has been discontinued for women this year, so I’ll be using the Montbell Storm Cruiser. I have complete faith in the Montbell quality. For any rain jacket to make it through three summers of solid thru-hiking is amazing! The material of the Storm Cruiser is amazingly strong and comfortable. I like the pit zips and the higher placement of the deep pockets is perfect for wearing with a pack. I was torn on which size to get, so I decided to err on the big side so I could wear it over my other jackets and layers if needed.
I usually carry a light down jacket and not a synthetic when I hike because I don’t tend to need the down jacket for extended periods while hiking or in poor weather. Knowing that it will be colder in Nepal, I want to have a two-layer system. The UL Thermawrap Parka will be my synthetic insulating jacket that I can sweat in. So far, I’m quite a fan. It’s warmer than it first appears and I love the deep pockets. We all will need to adjust to me wearing purple though, haha! When I finish the GHT and move over to Europe, I’ll return to my single down jacket strategy and will just carry the Montbell Superior Down Parka.
Now for the biggie. The amazingly indulgent Plasma 1000 Alpine Down Parka. This parka is like walking in a sleeping bag. It is only 8.4oz, which is comparable to some of the lightest down jackets out there, but provides a TON more warmth. The women’s version should be released this fall, so I am wearing a small men’s. The Plasma has 1000 fill power goose down. Meaning that they don’t need as much down to provide quality warmth. It is the lightest mid-weight insulating layer on the market today. With my preliminary tests, it’s super cozy. Interestingly, it seems to adjust to what you need it to be; making you just the right warmth without overheating you in less extreme temps. This is a special jacket I’ll be taking specifically for Nepal and any other future trips that would require some indulgent warmth.
Accessories
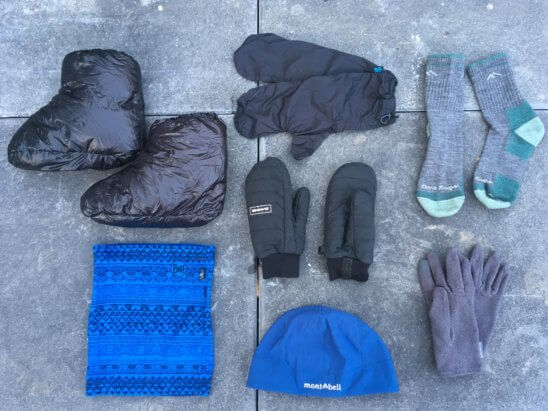
Zpacks Down Booties, Zpacks Vertice Rain Mitts, Darn Tough socks, Buff US Polartec Buff, Dakine Prima MItt, Montbell Climapro Watch Cap, and Montbell Chameece Gloves.
Again, given the cold, I selected gear that will add to my pack weight, but will be needed to stay comfortable. The only two items I plan to keep in my kit long term after Nepal are the Zpacks Rain Mitts and the Montbell Climapro Watch Cap.
- Montbell Climapro Watch Cap: A windproof beanie that has water resistance and an inner headband that’s lined with a wonderfully warm long fleece. The ears of the cap also dip down slightly to perfectly cover the full ear.
- Buff USA Polartec Buff: I couldn’t find a link online to this exact buff, but it’s a fuzzy warm Polartec material that’s going to provide the extra warmth I’ll want around my neck. I also will wear this in conjunction with my beanie to completely cover my head on cold nights in my tent.
- Dakine Women’s Prima Mitt: For the first time ever, I’m going with mittens. I went into many stores and looked for mittens that were still lightweight, but had a fuzzy warm inner layer. These seem to fit the bill and are only 3.6oz for the pair. They aren’t rated super warm, but have tested well, have a water resistance treatment, and will be great in conjunction with…
- Montbell Chameece Inner Gloves: The goal with these was to find a super light and warm glove I could wear in my tent on really cold night to type blogs on my phone. The touchscreen sensors on the pointer finger and thumb are the only ones I tested that weren’t too clunky to type. Also, they work great as an added layer under the mittens in really cold temps.
- Zpacks Vertice Rain Mitts: I’ve always used disposable nitrile gloves, but I’ll want something reliable in Nepal that I don’t have to worry about tearing and would fit over my mittens. These are great for that! The pair I got are quite tight around the wrist, so it’s tough to put them over the mittens. However, I’ve found once the gloves are over the mittens, it’s easier to pull both off and back on at the same time.
- Zpacks Goose Down Booties: I got down booties! I know there will be many nights we may stop early because we will be setting up to do a pass the next day and won’t want to go further up to sleep. These down booties will be key to staying cozy on those longer colder nights in tents and tea houses. They are basically the same weight as a pair of socks (1.9oz), but I decided to also keep my soft sleep socks to wear underneath them. In testing them, they do provide warmth, but I really enjoyed having socks on as well for the softness and warmth. Warning, when you order, notice that you DO NOT have a choice on what color you may randomly get.
- Darn Tough Hike/Trek Micro Crew Light Cushion: I’ve always worn light running socks while hiking. They are breathable and dry quick. I needed to up the warmth for Nepal and these Darn Toughs have been perfect.
Salomon X Ultra Mid 2 GTX, Petzl Leopard FlexLock Crampons, and CAMP USA Corsa Ice Axe
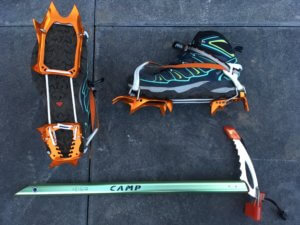
Salomon X Ultra Mid 2 GTX, Petzl Leopard FlexLock Crampons, and CAMP USA Corsa Ice Axe.
- Salomon X Ultra Mid 2 GTX: SHOES! My toes get super numb easily. I’ve always used trail runners for long distance hiking, but I know I’ll need something more for at least the first half of the GHT when we will hit more weather, higher passes with snowfields, and generally rougher terrain. I love Salomon shoes, but the newer versions of the trail runners don’t fit my foot right. I was sooo ecstatic to try these on and find that they fit perfectly and comfortably. They are also waterproof, which I’ve always warned people not to do. I’ve done enough training with them to know that I may have times my feet will be hot, but they are going to be worth it when I get to the cold wet stuff. I may switch to my trail runners about halfway through…we shall see…
- Petzl Leopard FlexLock Crampons: Our group debated the whole crampon/mircros dilemma. We basically have one major pass that we will want the crampons and ice axe for, and others are likely ok with just micros. Since there’s not an ideal way to ship things reliably, we weren’t sure what to do. Turns out, that the Petzl Leopard FlexLock Crampons (12.5oz) are just an ounce more than my Kahtoola Microspikes. A full detailed review of of the Petzl Leopard Crampons can be found from another GHT group that highly recommended them. Thank you to Eef for writing about these and solving our problem! Note, there are two types. Ones for regular hiking shoes and another for shoes that have heel and toe welts. Basically, they are aluminum, 10 points (not 12), and rather than a metal adjusting bar between the heel and ball of the foot, there is a Dyneema cord system. Yes, minimal for crampons, but they will get the job done for what we are doing. Yay!
- CAMP USA Corsa Ice Axe: After many years of using the Black Diamond Raven ice axe, I’ve decided to spend the money to save the weight and use the CAMP USA Corsa Ice Axe. It will save me 7oz of weight. Really worth it given how heavy the pack weight will be on this trip.
Electronics
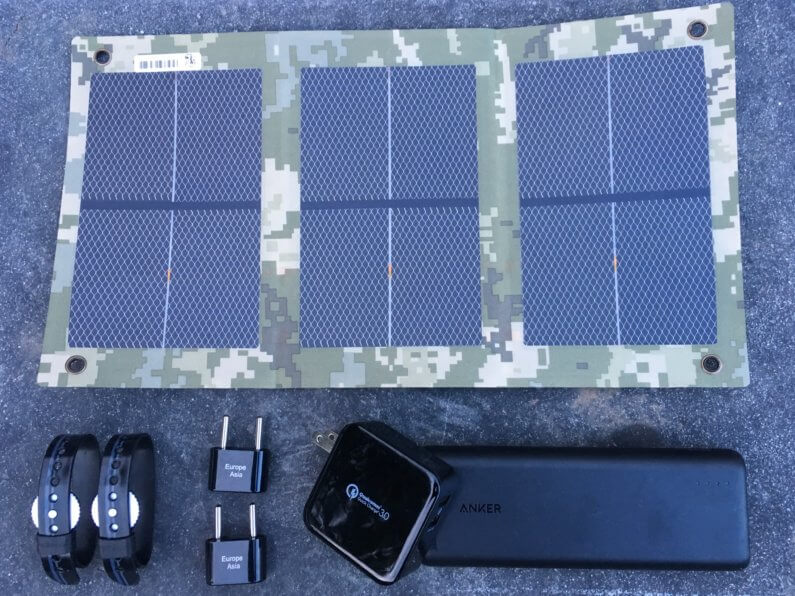
Gear to hopefully alleviate the strain of few options to charge in very remote areas.
You knew this entry wouldn’t end without an update on my electronics! Not much is changing, so this is just a photo of what is new. The full gear list is below. I still plan to use my iPhone to blog and take photos. The main concern with electronics in Nepal is that we will rarely be in civilized places with electricity. We may be able to recharge at remote tea houses, but they are often working off limited solar power, and we do not want to drain their one source of power. So here’s what I’m trying…
- Anker PowerCore Speed 20000mAh Qualcomm Quick Charge 3.0: This is the same Anker battery I’ve been using, but it has the ability to charge twice as fast (6-7hrs). When you might get 30mins to charge something, having one that charges twice as fast is going to be an asset. The question is if the plugs we will be using will produce enough power to make this useful? Worth a try…
- iClever BoostCube+ 34W Dual USB Wall Charger w/Qualcomm Quick Charge 3.0: My hesitation in getting the quick charging Anker is that it requires a wall charger with the Qualcomm Quick Charge 3.0 ports. Finding these without a ton of extra weight means that I will now have a wall charger with just two USB ports. If there’s just one plug, and three of us want to charge at once, I no longer have a wall charger with four USB ports to share with other hikers. There’s definitely a possibility of conflict there. That’s why I’m also bringing…
- Gossamer Gear Solar Charger: I’ll be testing this lightweight (3.5oz) solar charger that Gossamer Gear may be adding to their site. It’s still in the testing phase at the moment, but I like that it’s lightweight and will give me another option for charging if need be.
- Lewis N. Clark Europe/Asia Adapter(2): I have two of these light travel adapters to be able to plug in at two different sockets if needed.
- PSI Motion Sickness Bands: These are not electric, but are in the photo. I don’t even want to imagine all the travel and bumpy jeep roads we will be on. Hopefully, these and some dramamine will help my sensitivity to motion sickness…
Snow Peak GigaPower 1.0 vs Trail Designs Sidewinder w/Kojin Alcohol Stove
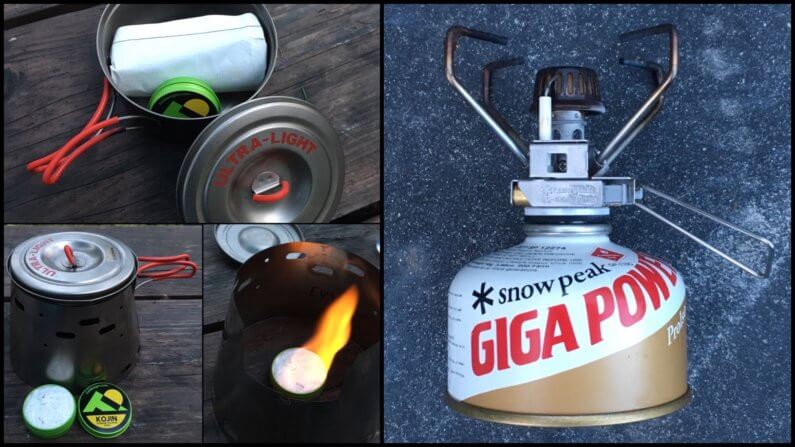
I am reluctantly going to have to use a cannister stove on this trip. I haven’t used my Snow Peak GigaPower 1.0 stove for 7yrs, but it’s just not feasible to take an alcohol stove to Nepal on this particular trip. I don’t even know if any stove at all is worth the burden, but do know I love a hot meal. Many dinners will be from tea houses, and we will have weeks between resupplies. It’s just tough to know if this one will be worth the carry.
I am excited that I’ll be carrying the Trail Designs Sidewinder w/Kojin Alcohol Stove after the GHT. This setup will give me a stove and windscreen that fits nicely inside my pot instead of carrying a boxy container. I’ve always used the Trail Designs Caldera Cone setup, and am excited to upgrade to this new Kojin Stove and the Sidewinder. I will bring the Sidewinder with me as a makeshift windscreen in Nepal.
Meds: Diamox, Flagyl, Zithromax, Rehydration Salts
I know this might seem like a stretch to include in a base pack weight, but this is for sure something I don’t carry major quantities of on most hikes. There will be a very high likelihood of stomach issues (little sanitation in the middle of nowhere) and issues with elevation. It is not uncommon for people who do the GHT to get diarrhea multiple times and food poisoning that causes vomiting many times as well. There are very few options to send our own resupplies, so some of our diet will come from tiny personal tea houses in the middle of nowhere. This won’t be the touristy, well traveled Nepal on the common treks. I hope to not use these meds and that they will remain a constant 3oz addition to my base pack weight, but it will be worth the carry just in case…
Welp, that’s the main contenders for gear changes in Nepal. It was a draining process to decide on these options, but I hope the time and effort put in will be worth it and will make the trip a bit more comfortable. More details on the Great Himalaya Trail to come, but for now, here is the full GHT Gear List that comes out to a BPW of 16lbs 7.1oz for half the trip, and for the half that I’ll be carrying an ice axe and crampons, my BPW will be 17lbs 14oz.


Nice write-up. I’ve had the Sawatch quilt for several years and it’s super warm and has stayed very puffy. I don’t like the cord system (for me the quilt attachments pop off during the night) but it’s easy to tuck the bag under you and not use cords at all.
Interesting. I do think that since I’m smaller, I may not stress it as much. It seems that if It’s clicked in to the tightest clip (each one has two, one is tighter than the other), it would be tough for it to come off. I agree, that it wraps around me just fine too.
I don’t squirm much in my sleep but wake up occasionally and flip sides after one side numbs up (I’m bony and probably need a softer pad). So the clips sometimes detach when I’m flipping even though I’m careful. For most people I think the clips work okay.
I solved this problem by fitting a thicker cord. And join the two cords together to help not loosing one. Overall I prefer the EnlightenedEquipment elastic plus proper clips.
Wired – you may want to look into GSE (grapefruit seed extract). This might help with some of the intestinal issues you are predicting.
I will, thanks. I’ve been given a laundry list of suggestions, however I also think some of us are just more sensitive than others. Sadly, I tend to have a pretty sensitive stomach…
Erin, Have a safe, fantastic journey. Just a comment from past experience in Nepal. I stayed in teahouses. Never got any GI sickness. Did get acute mountain sickness however. Evacuated by helicopter from Gorak Shep. Also, can be quite cold in the higher elevation teahouses. I used a -30 degree bag with a liner. Enjoy and stay warm and healthy.
Yep, I feel like if it isn’t one thing, it will be another in Nepal and I’ll never be 100%…I’ll be lucky to hit 70% most days I’d think!
So looking forward to this new adventure!
Wahoo!
It’s happening!!!
Congratulations on the new sponsors, as they’re all amazing companies! What a relief to have your gear pinned down without worry.
I am beyond excited for you, and know you can do this 🙂
Lengths of love!
Aaaaahhhhh<3
The Montbell Storm Cruiser seems like the one that fits me, and it’s 3 layer Gore C-Knit. It’s the one jacket that has my attention. I have a Marmot Essence and am thinking of returning it. For a few ounces more the Storm Cruiser seems like a lot more jacket, yet weighs less than my OR Foray, Arcteryx Alpha/Beta’s, etc. I got my first Goretex Jacket in 1978, and while the technology is not perfect, it’s gotten better, and more importantly, Gore and quality makers stand behind the product.
I totally agree with all you just said. I would for sure choose the Storm Cruiser over the Marmot Essence. I’ve found that when really using these jackets in cold rain or even snow, those couple extra ounces are well worth it!
Erin, All the best for a safe and rewarding journey of a lifetime! I’ll be following along as always. Let the journey begin!!!
BTW, Ryan Jordan at BPL just did a review of the Tarptent Notch Li in 50 mph winds. I don’t have the premier membership so I don’t have access to the final results. I assume it passed with flying (not literally of course) colors.
I heard about that, but also don’t have the membership to see it. The Tarptent Notch Li released definitely was the buzz of the hiking community this past month, and rightfully so! I do have a sentimental attachment to Tarptent (my first lightweight tent was the Contrail and I still have it) and have wanted them to have Dyneema options for years!
Love checking out your new gear! I can shop vicariously! The quilt sounds like such a great idea! Be safe AND WARM. We’ll have you in our hearts while you are on the trial.
Thank you:) It is fun to have this done for you if you ever need it. All the shopping and comparing is exhausting! I need a professional shopper who enjoys finding all this stuff. I just want to have it without the effort of researching, haha.
Ha ha! I mean TRAIL not TRIAL.
Can´t wait!! I´m re-reading First across the Roof of the World (G. Dingle + P. Hillary), description of the first ever traverse from Kanchenjunga to K2 in 1981, and thinking of you. They had a great journey and I´m sure you will too!
Oh cool!
Just thought I’d mention an issue reading this. The text keeps jumping up and down due to those changing images.
I know, it’s frustrating. I have someone doing some work on the blog, so some settings have changed that are affecting that. I’m hoping to get it fixed…
Erin,
Always enjoy your gear posts. You are obviously in, spending $5k plus!
I’d really like that Notch Li. May just be my next tent purchase.
Along for the ride as always.
Well, I did luck out with much of that being sponsored…but it can be spendy, so I like to be open about how much these things can cost!
Well, ya know, if I was a cottage manufacturer, I’d want to sponsor you too. Your blog is top-notch. I’m just glad I found it all those years ago. Can’t wait for you to start!
It’s pretty surreal how far it’s come!
Lucky for us, it is really real!
Just checked in to see when you depart for this new adventure and delighted to see, that today, your time, you will be on your way to Nepal. Totally looking forward to this new ‘Wired’ adventure and send best wishes for a safe, amazing trail. Just last year, we watched a series on TV of, I think, an American hiking it.
Some incredible footage.
Have fun.